Overview
Discovery is the first step to understanding your organization’s EUCA landscape. This module is designed to scan network locations in order to identify EUCAs and analyze file content. Based on organization-specific attributes, Discovery will assign a Structural Complexity Rating to each detected file. Discovered file results are found in the Unregistered Inventory section of the Apparity Inventory Management System (AIMS).
There are two methods for running a Discovery scan within an organization:
- Centralized Discovery
- User-Initiated Discovery
Centralized Discovery
Centralized Discovery is initiated from the Apparity Admin Console. Typically, it is the responsibility of the Apparity or IT Admin to initiate the centralized Discovery scan. These scans can be set to run once or continuously in order to monitor new files and modifications to existing files. For more information on how to initiate the centralized scan, please reference the Apparity Technical Implementation Administrator Guide.
Central scans are configured within the ‘Discovery Scan’ tab in the Apparity Admin Console. These scans can be set to run once or continuously in order to monitor new files and modifications to existing files. Upcoming scans, running scan progress and completed scans can also be monitored in this tab. The individual file details, however, are displayed in the Unregistered Inventory section of the Apparity Inventory Management System (AIMS).
Discovery Scan
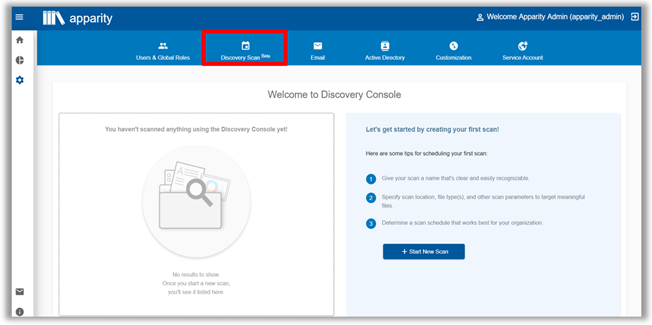
How to Run a Discovery Scan
- Navigate to the Discovery Scan tab,
- Click on the Start a New Scan.
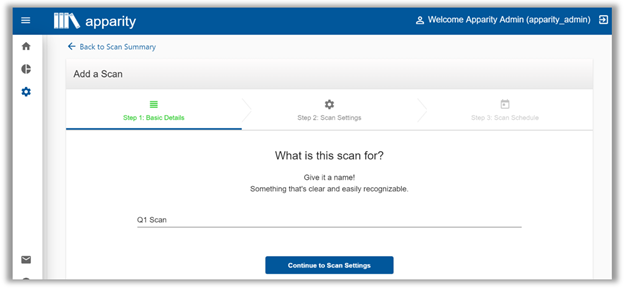
- Give your scan a unique name in the open text field. Then click on Continue to Scan Settings to set up the specifics of your scan location.
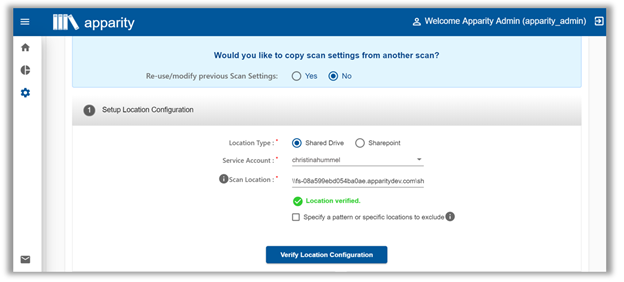
- The next screen will prompt you to use the default settings of a previous scan or enter new credentials. By clicking on Yes, you will retain the same specifics of the last scan. By clicking on No, you will then have to select the Location Type, choose a Service Account that has read-only access to the scan locations, and enter the UNC path of the new scan location. You can hover over the icon for format specifics. After those credentials are entered, please click on Verify Location Configuration to confirm and continue. At this point, you can also opt to exclude certain file locations by selecting the Specify a pattern or specific locations to exclude checkbox and entering the exclusionary parameters.
- After completing the location details, you can add a variety of parameters:
- Last Modified Parameter (Required): Filters results to show only files modified within the past X number of days).
- File Size Parameter (Optional): Filters results smaller than the entered size. If you would not like to add this filter, keep it at default 0KB.
- File Type (Required): Select which file types you would like to discover. Excel files will undergo “deep” structural scanning, while non-Excel file types will undergo “shallow” directory detail scanning. Anything beyond the listed Excel, Access, R and Python types can be added by adding the text of the file extension (without the preceding ‘.’). For example, a Business Objects.wid file would simply be added as ‘WID’.
- Excel Parameters (Optional): Excel files, for which we can determine structural details like number of formula cells or presence of macros, can be further filtered by these attributes.
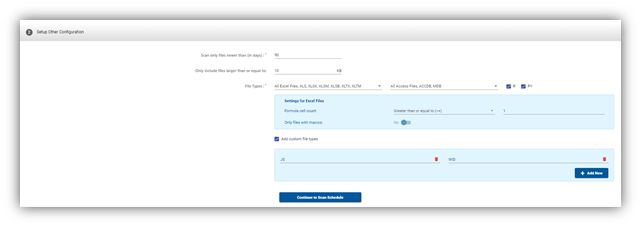
- After reviewing the location and scan parameter details, click on Continue to Scan Schedule.
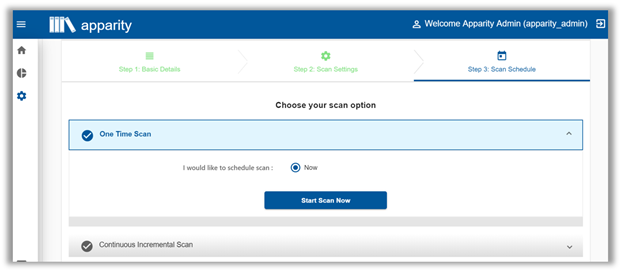
- At this point, you will decide whether to set up the scan to run once or on regular intervals with Continuous Discovery. If you would like to only scan once, go to the One Time Scan dropdown and click on Start Scan Now to initiate Discovery.
- If you would like to have an ongoing scan, go to the Continuous Incremental Scan dropdown. In this setup, you will run an initial scan similar to the One Time Scan, but you will schedule scans on that will run on regular intervals. These subsequent scans will detect new files and any modifications made to previously scanned files. Click on Schedule Incremental Scans to choose between daily, weekly, or monthly intervals. Then choose between Specified Date & Time or Specified Criteria & Time and fill in the appropriate conditions for the subsequent scans. After reviewing the scan setup details, click on Finalize Schedule and Start Initial Scan to begin with the preliminary scan.
- After setting up and initiating the Discovery scan, you will be taken back to the Discovery module. By default, Apparity will show the Running Scan tab, and you will be able to view the progress of the scan you set up and all ongoing scans. You can also click on the Upcoming Scan tab to view scans scheduled in the future and the Completed Scan tab to review scan summary results. Once the scan is completed, the individual file details are placed in the Unregistered Inventory section of the Apparity Inventory Management System (AIMS). Depending on user permissions, IT Administrators may or may not have the ability to view
Note: Scan times will vary and are contingent on several factors such as the number of files in the designated scan location(s), the types of files, and file size. One Time Scans and the initial Continuous Incremental Scan will generally take the same amount of time to execute. Subsequent scans for the Continuous option will be quicker because Apparity uses the initial scan as a comparative baseline and will only look for new files and modifications to existing files.
Discovery Scan in Progress
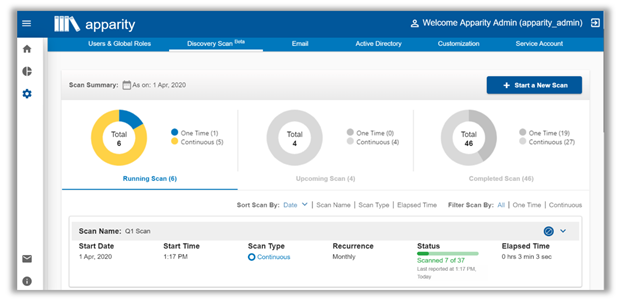
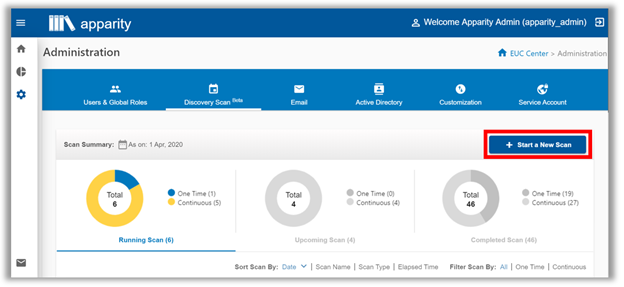
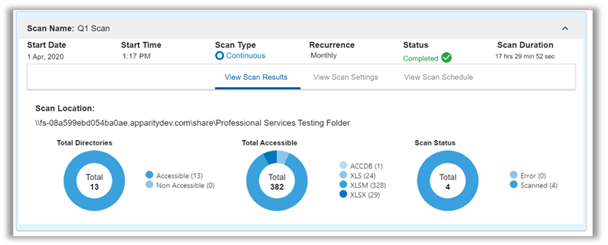
Navigating the Discovery Scan Summary
As previously indicated, the Discovery Scan Summary is divided into three sections: Running Scan, Upcoming Scan, and Completed Scan. Each tab displays the total number of scans associated with that particular state of Discovery, as well as a breakdown of One Time and Continuous scans. You easily configure a personalized navigation display with sorting by the date, scan name, type, and duration, as well as filtering by all, completed, or aborted scans.
Discovery Scan Listing Navigation
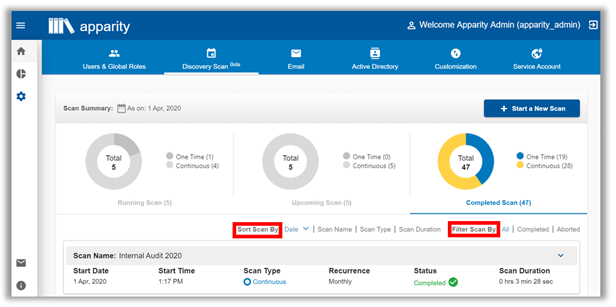
To view the details of a particular scan, click on the dropdown arrow to the right of the listing.. There, you will be able to view the detailed breakdown of the scan results, settings, and schedule, which are divided into their respective tabs. It should be noted that One Time scans do not have the third Schedule tab due to how they are set up.
Scan Details
How to Abort a Running Scan
If you wish to stop a scan currently in progress, simply go to the Running Scan tab and click on the Abort icon next to the detail dropdown on the listing. Then a confirmation box will pop up to confirm your intent. Click on Yes to abort the scan and on No to abandon the task. Aborting a scan is a final action and cannot be undone. If you wish to re-enable an aborted scan, you will have to replicate it with a new scan.
Abort Scan icon
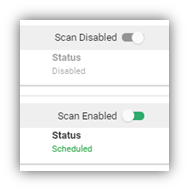
How to Disable and Enable Future Scans
If you set up a future scan and would like to suspend it, go to the Upcoming Scan tab and go to the individual scan’s detail dropdown. There, you will see an Enable/Disable toggle in the upper righthand corner of the listing. You can simply toggle to Disable in order to stop the scan and toggle it back to Enable to run it at a future date.
Enable/Disable Scan
How to Modify a Scan
Unfortunately, there is not a way to modify a scan once it is finalized and begins to scan. In this case, you would have to abort or disable the scan, depending on its state, and copy the scan (Figure 21) and change desired parameters. You can modify the scan details, however, if you are in the scan setup wizard and have not initiated the scan. Simply go back in the setup wizard, make the changes, and proceed to initiate the scan.
User-Initiated Discovery
Users can initiate a scan by selecting the Scan Shared Drive icon to start the Discovery process. After the icon is selected, Apparity will automatically open the Discovery Tool Windows App window, which will prompt users to choose the Shared Drive or mapped SharePoint for the scan.
Discovery Tool Icon

Discovery Tool Windows App Window
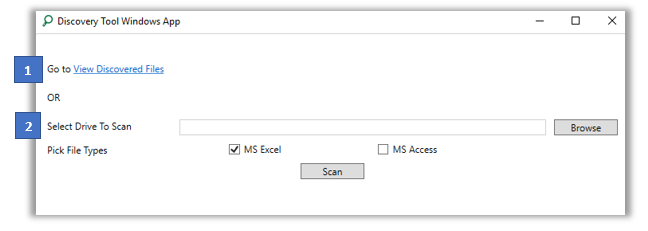
At this point in the process, users must determine how they would like to proceed with the scan.
- If View Discovered Files is chosen, those with Business Administrator or higher permissions will be presented with the Discovery scan results in the Web browser.
- If Select Drive to Scan is chosen, the user will be required to select the shared drive they would like to scan. Users then press the ‘Submit’ button to initiate the Discovery scan.
NOTE: The amount of time it takes to finish the scan depends on the number and size of files selected from the Shared Drive.