1. Understanding & Managing the Version History Pane
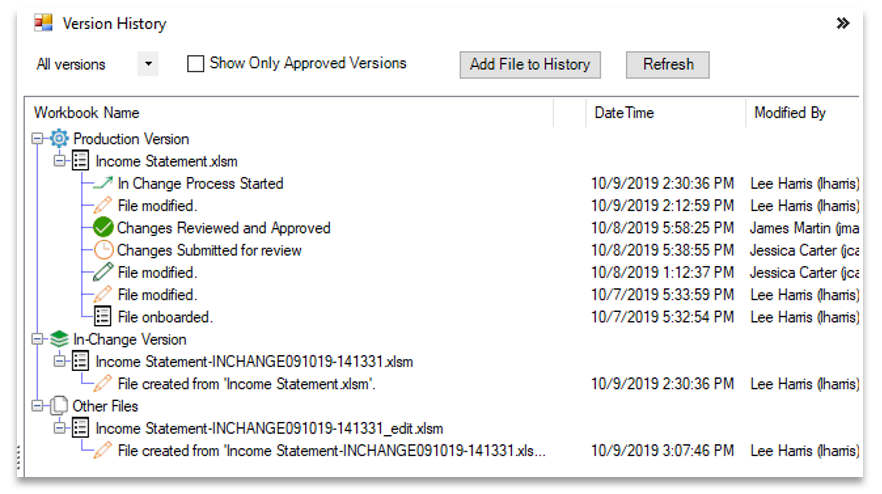
The Version History pane provides users with a detailed overview of all historical changes occurred throughout the life of a spreadsheet since the initial onboarding.
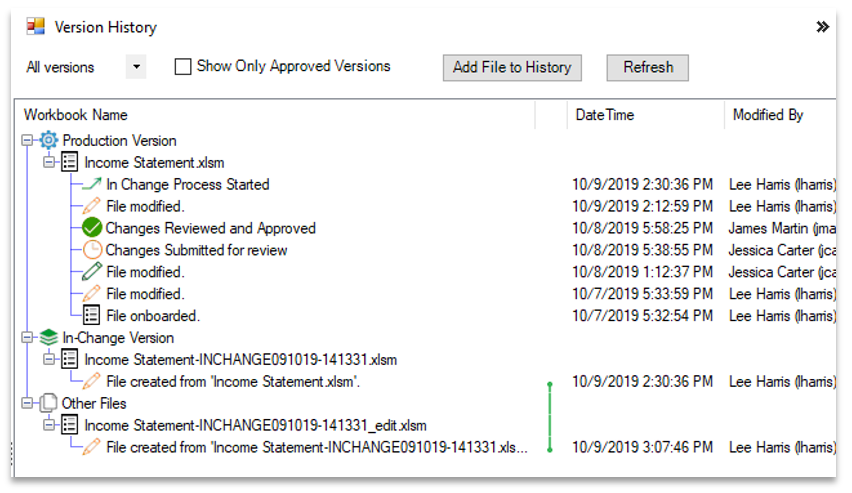
Version History Pane
2. Version History Structure
The structured layout and functionality of the Version History pane allow users to effectively navigate, organize and identify related files and their associated versions.
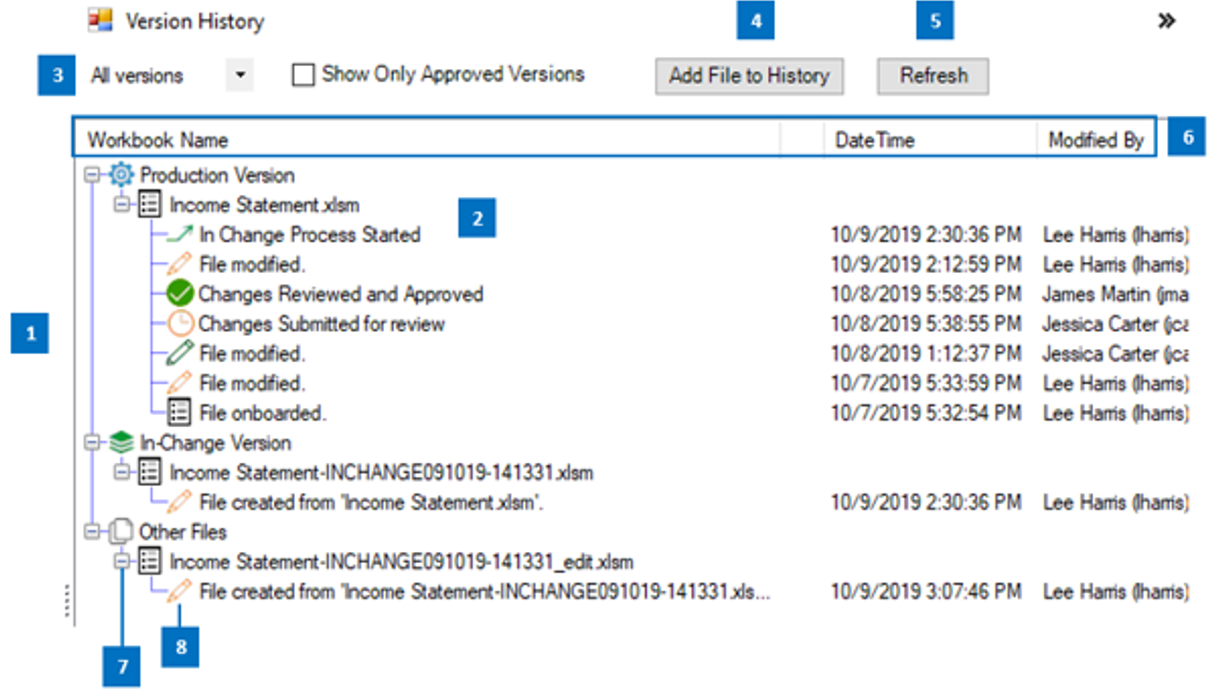
1. Version Categories: The Version History pane is separated into three categories to provide the user with valuable information about each version of the file.
- Production Version: Captures the current, live model in production, and all associated events linked to that version. Please note that there can only be one Production version at any given time, and the In-Change process can only start on the Production Version of a file.
- In-Change Version: Captures the copy of the Production version that is currently being developed, updated, and tested. There will not be an In-Change Version, unless a user has previously initiated the In-Change process. Note: Only one in-change version can start at a given time
- Other Files: Captures all versions that are not in production or the In-Change process. This file type designation includes versions created (e.g., Save As, Copy, and Rename) from the Production or In-Change Versions.
2. Version Grouping: Apparity utilizes a grouping structure under each Version Category to capture all the file’s versions and events.
a. Version Group(s) (Tier 1) – Used to reference a unique Workbook Name (saved to a single location). When a spreadsheet is renamed or moved, a new version group is created.
b. Individual Version(s) (Tier 2) – Time-stamped versions of a single workbook (same name and location) that represent various modifications of the file. Whenever a file is modified, saved and closed, a new individual version is created.
c. Events (Tier 2) – Represent different actions taken against a spreadsheet. Events also show different statuses associated with the review and approval cycles or the In-Change process.
3. Time Filter: Provides users with the ability to filter all versions modified within a specific time frame.
4. Add File to History – Apparity provides the Add File to History button, so users can introduce version and access controls to an unmanaged version of an Apparity-managed spreadsheet. Typically, this is an older version of the spreadsheet that was created before the initial onboarding. The historical version is added to the spreadsheet’s Version History using a condensed onboarding process (further details in the Add to File History section). Users will not be able to compare this added version to any other previous versions.
5. Refresh: Apparity offers the Refresh features to rearrange versions and events in the Version History pane back to the original state when the file was initially opened. Refresh will also update the Version History pane to capture additional actions that occurred since the file was opened (e.g., Review Approved). This feature is truly effective when managing numerous versions of a spreadsheet with the added difficulty of not being able to view which version is currently open.
6. Version History Data: Each item within the Version History section is tagged with three separate data fields: Workbook Name, Date Time, and Modified By. These data fields help users differentiate between spreadsheet groups and versions.
a. Workbook Name (Version Groups) – File name as saved by the user.
b. Workbook Name (Individual Versions) – Version Update Comments, which provide a high-level description of the updates made to the associated version (See ‘Version Update Comments’ section for further details).
c. Workbook Name (Events) – Shows the actions and status changes that occurred for a Version Group.
d. DateTime (Individual Versions or Events) – Date and time that the spreadsheet was saved and closed.
e. Modified By (Individual Versions or Events) – Username assigned to the user who performed the update to the version or event.
7. Version Group Expand Button(s): Each Version Group is aligned with an expand button, allowing users to show and hide all versions and events associated with a specific Version Group.
8. Version Icons: Each item within the Version History section is aligned with an icon that illustrates the version or event updates and status.
9. Show Only Approved Versions: Provides users with the ability to quickly filter the Version History pane to show only those versions that have been reviewed and approved.
3. Version Update Comments
Version Update Comments are assigned to each version and are captured under the Workbook Name section within the Version History pane. Each comment identifies high-level updates and actions that were performed in that particular version of the spreadsheet, while also providing users with a reference point for searching against past versions.
Comments are produced as User Created or System Created. User-created comments are customized and are provided upon save and close by the user, while Apparity provides system-created updates.
See below for a list of the comments included in the Version History pane.
- File Onboarded: Indicates the originating spreadsheet that was taken through the initial Apparity onboarding process.
- File Created from [Workbook Name]: Indicates when an onboarded file was (1) cut/copied to a new folder location, (2) renamed from the Windows Explorer folder location, or (3) renamed using the Save As operation.
- File Added to History of [Workbook Name]: Indicates when a user onboards an unmanaged file to an existing onboarded spreadsheet’s version history, using the Add File to History button.
- Rolled back to version as on [Date & Time]: Shows when a user has chosen the Restore to prior version option to reinstate a previous version as the current version.
- File Modified: Indicates when a spreadsheet has been saved and closed, and User Created comments were not provided. Please note that saving the file without closing will not be registered in the Apparity version history, although the changes will be retained.
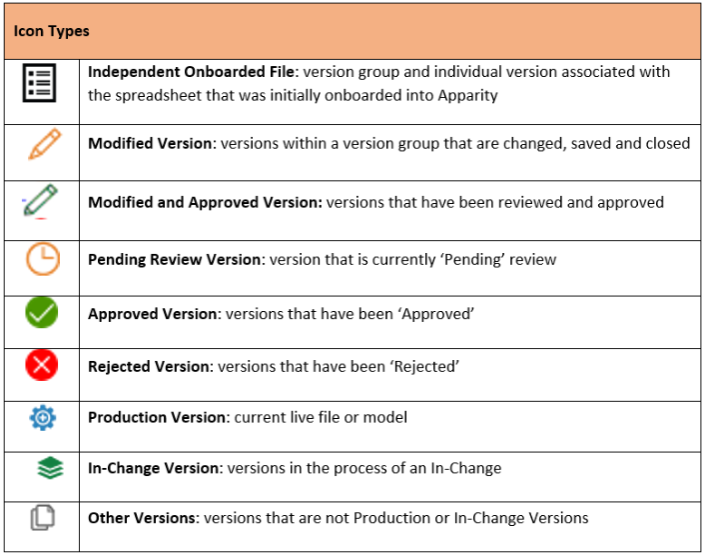
4. Version Icon Types
These icons are aligned with each version, and they provide users with an indication of the status of the version as it relates to relationships, content changes, and reviews.
Version Icon Types
5. Managing Version History
When a user saves and closes a spreadsheet monitored by Apparity, Excel will automatically save the file in the usual way.
As a part of this process, Apparity will immediately capture and store all the changes that the user made to the spreadsheet during that session.
When the file is re-opened, users will have access to the Version History pane and all the attributes that were described above, which will include the most recent changes that were made.
To help ensure effective management of all versions of a file, users can perform various actions by right-clicking on the 1.) version groups, 2.) individual versions, or 3.) events in the Version History pane.
6. Right-clicking on Version Groups
When right-clicking on a version group from the Version history pane, users will have the option to take the following actions.
Version Group Right-Click Options
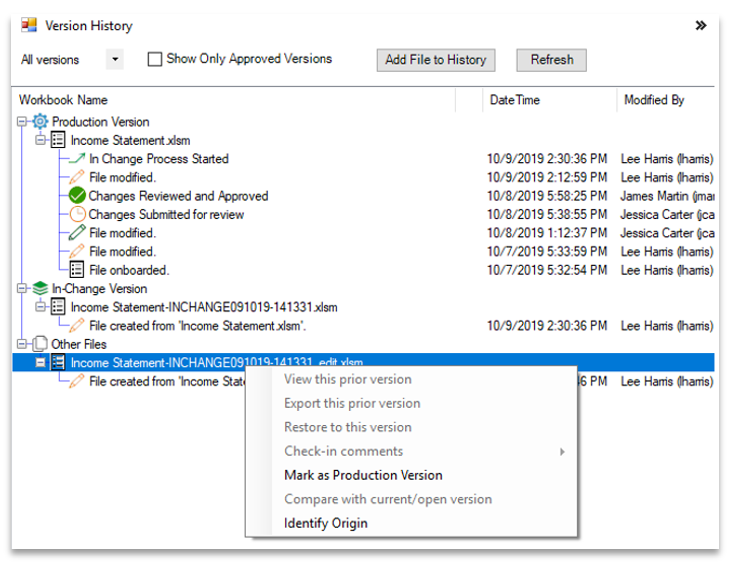
- Mark as Production Version replaces the current Production version with the version of the file that the user selected. The Mark as Production Version option will only be available when the user selects a version that is in the Other Files section of the Version History pane. Also, the user must have that version of the file open for this action to complete.
- Identify Origin allows the user to trace a version back to its parent version by connecting the two versions with a green line in the Version History pane.
Mark as Production
- Users can mark and move a version of a file from the Other Files section of the Version History pane to the Production Version section by selecting Mark as Production Version.
- This option is only available when right-clicking on a version group that is located within the Other Files section of the Version History pane.
- This selection will replace the current Production Version with the version that the user selected.
- The result will move the current Production Version to the Other Files section of the Version History pane.
- A new event will be created, illustrating that the Production Version has changed.
- An email notification will be generated and sent to the model owner and approver (entered from the onboarding screen), as a notification that there is a new Production Version.
Identify Origin
- Users can discover the origin of a file with the Identify Origin option that is displayed when right-clicking on a version group. This option will be available on all version groups, regardless of which version category they are located (e.g., Production Version, In-Change Version vs. Other Files).
- Identify Origin allows users to trace a version back to its parent version by connecting the two versions with a green line in the Version History pane. In the figure below, the green line in the Version History pane shows that Version 3 of the file was created from Version 2 of the file.
Trace a Version back to its Parent File with Identify Origin
7. Right-clicking on Individual Versions
When right-clicking on a single version from the Version history pane, users will have the option to take the following actions.
History Pane View & Version Details
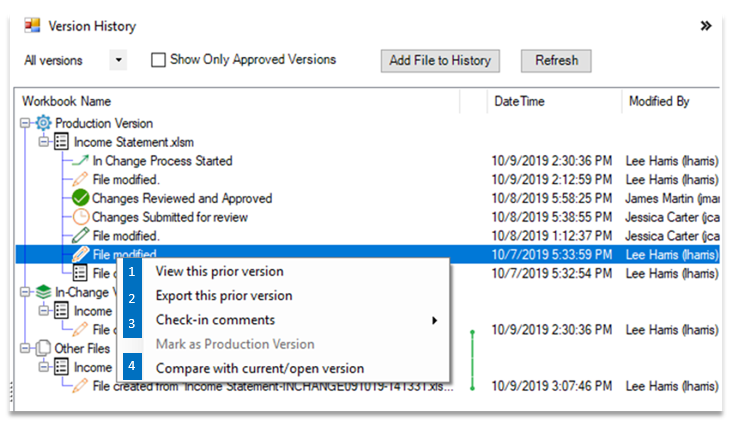
- View this prior version: By selecting this option, you will remove a read-only copy from Apparity, and Apparity will not track all changes made to this copy. The original version will remain in Apparity.
- Export this prior version: This option exports the version out of Apparity as a full working copy without Apparity fingerprint and related controls. By selecting this option, Apparity will not track all changes made to this copy. The original version will remain in Apparity.
- Check-in comments: Are automatically added to this version when the spreadsheet is updated, saved and closed; Include Modification Time, File, User, and Comments.
- Copy comments to clipboard: Allows users to copy the contents held within the comments section.
- View comments: Allows users to view the Modification Time, File Path, User who modified the file, and user comments inputted upon save and close.
- Compare with current/open version: Generate an in-session change log between the version of the spreadsheet currently opened in Excel and the previously modified version.
- This option is only available when a single version is selected.
- Change logs generated in-session cannot be submitted for review.
- Compare selected versions: Create a change log between two selected versions and initiate change log review (not pictured here, only available as an option when two versions available for comparison are selected).
View this Prior Versions
- By selecting View this prior Version from the Version History options menu, the user can generate an exact read-only copy of the spreadsheet as it was saved at that date and time.
- The read-only copy will be generated outside of the Apparity control framework. In effect, no subsequent changes or versions created from this copy will be tracked in Apparity.
- The prior version will be generated with a Read Only Historical Version watermark embedded across each worksheet within the spreadsheet to avoid potential confusion.
- When viewing a prior version that was generated by this option, users will not have access to the standard Apparity functions (i.e., Change, Version, and Access Management).
Exporting Prior Versions
- To export a full working copy of a version that is not subject to any controls or monitoring from the Apparity solution, users can select the Export this prior Version option from the Version History Options Menu.
- Once the option is selected, Apparity confirms the user's choice to export the spreadsheet and presents them with a regular Excel ‘Save As’ dialog box. Within the dialogue box, Apparity will automatically append the date, time and ExportedFromApparity to the new filename. The user will choose the location where the exported version should be saved.
NOTE: Since the exported copy of the spreadsheet will no longer be subject to Apparity's controls or tracking, the file cannot be added back to the Version History without disrupting its continuity. Content comparisons with other existing versions cannot be performed. The exported copy is intended only for one-off analysis and distribution (not continued use or maintenance).
Restoring Versions
- A user always has the option to restore any version available in the Version History pane as the current version by right-clicking on the version of choice and selecting Restore to this Version.
- Note: SharePoint files cannot leverage this functionality directly; to restore to an older modification using Apparity, use "Export" and "Add File" features.
- Apparity will confirm the option to recover the spreadsheet and restore it as the current version. Note that to restore to a previous version that exists under a different version group, users must have the file with the specified name open.
- When the action is complete, the file will automatically close and re-open to the restored version. The Version History pane will be updated to reflect a new modification and the comment associated with that modification will be Rolled back to version as on.
- Also, the previous version will remain in the Version History pane and can also be restored at any time.
Compare with Current/Open Version
- To compare a prior version with the current (in-session) version, the user must first select that prior version from the Version History pane and select the Compare with current/open version option within the Version History option menu.
- This action will prompt Apparity to generate a change log.
NOTE: When conducting an in-session compare, users will be unable to initiate a review from the change log. This option is intended to help users identify the impact of various changes before they are saved and closed.
Compare Selected Versions
- To compare any two versions in the file’s Version History pane, the user must first select the two versions to be compared (by holding down the Ctrl key) and then select the Compare Selected Versions option within the Version History option menu.
- Clicking on this option will immediately generate the change log.
Compare Selected Version Option
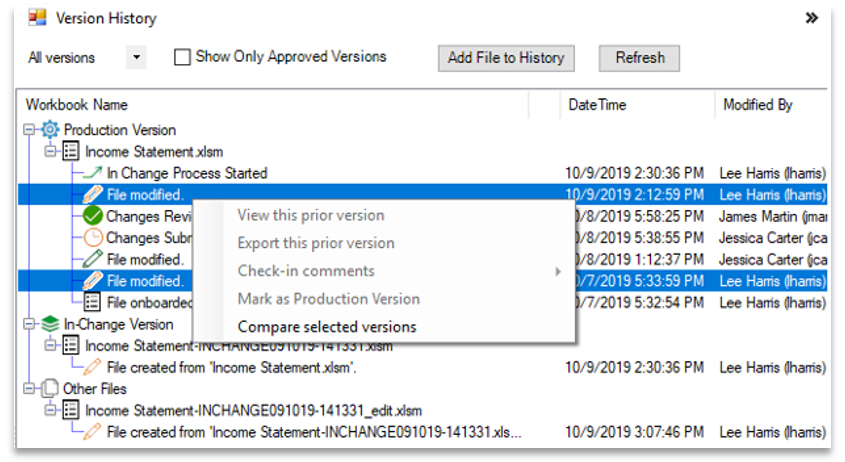
NOTE: The Compare Selected Versions option will only appear if the user has selected two versions with linked history.
8. Right-clicking on Events
When right-clicking on an event from the Version history pane, users will have the option to take the following actions, depending on the type of event that is selected.
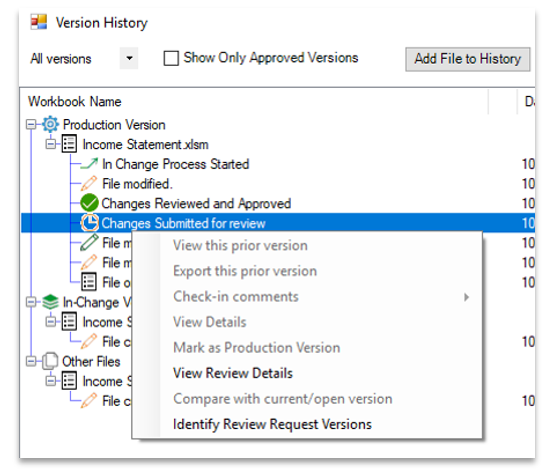
View Review Details
- Once a review request is submitted, a user can review the details of the review that was provided by right-clicking on the Changes Submitted for Review event and selecting View Review Details.
- Once selected the Review Details window will open and display details of the review, including Status, Requester Name, Requester Username, Request Time, Change Summary (the number of changes and summary), and Reviewer details.
Identify Review Request Versions
- Once a review request is submitted, a user can see which versions are currently being reviewed.
- To view the versions, right click on the event, Changes Submitted for Review and select Identify Review Request Versions. A green line will then connect the two versions under review.
Identify Reviewed Version
- After a Review and Approval Cycle is completed, a user can see which version was approved or rejected.
- Right-clicking on the Changes Reviewed and Approved/Rejected event and selecting Identify Reviewed Version will show the version that was either approved or rejected.
- A green line connects the approved or rejected version to the event.
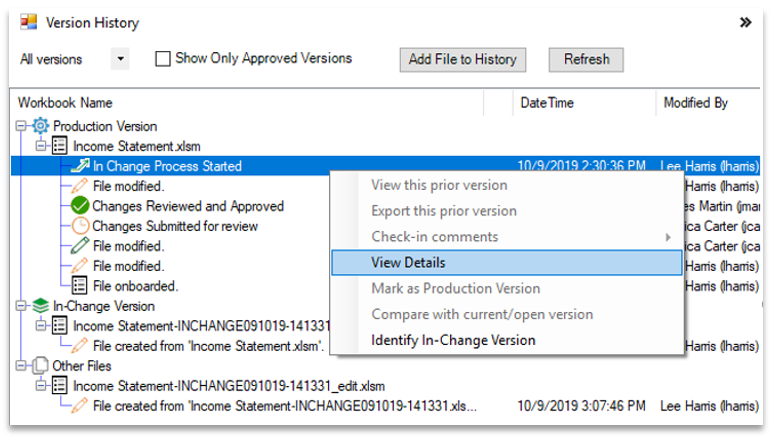
View Details
- When an In-Change process is initiated, the Version History pane will be updated with events to notify the user of the approval progress, such events include: In-Change Process Started, Permission to Perform In-Change Granted, and Permission to Perform In-Change Rejected.
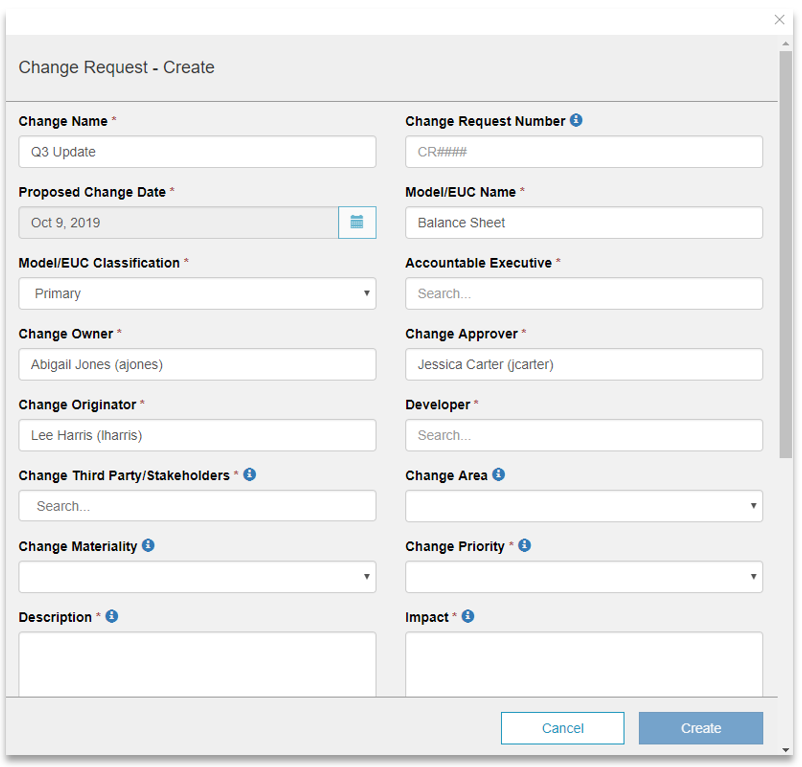
- Users can right click on any of the events and select View Details to see the Change Request form that was associated with the In-Change process.
View Details Option
Change Request Form
Identify In-Change Relationship
- Users can also right-click on any of the In-Change Process Started, Permission to Perform In-Change Granted, and Permission to Perform In-Change Rejected events and select Identify In-Change Relationship to show the relationship between the Production and In-Change Versions.
- A green line will connect the In-Change Version to its associated Production Version.
Identify Event Relationship
- After an In-Change process is completed and the In-Change version is published to Production, two events will be updated on the Version History pane. Marked as Production Version will show as an event under the new Production Version and Marked as Non-Production Version will show as an event under the previous Production Version that was replaced.
- The user can right-click on either of these events and select Identify Event Relationship to see which version replaced the other as the new Production Version.
- A green line will connect the associated versions.
9. Add File to History
The Add File to History button allows users to add a file to the Version History of an existing Apparity monitored spreadsheet. Spreadsheets onboarded using the Add File to History button will have the following attributes:
- They will be recognized as a historical version of the file.
- They can only be compared to subsequent versions stemming from this onboard, but they cannot be compared to any other versions resulting from separate onboarded versions.
- They will automatically inherit the properties of the initially onboarded spreadsheet (i.e., ID and name, permissions and restrictions).
Once a user identifies a file that he or she would like to add to the Version History, he or she will be required to complete a condensed onboarding process to ensure that fingerprinting is applied, which will introduce version and access controls to the file.
- Open Onboard Window – Click on the Add File to History button.
- Select File – Choose the file that should be added to the file history and click on Open.
- Start Onboarding – Review and confirm the spreadsheet onboarding summary details, select the Start Onboarding button.
- Confirm in Version History – Validate onboard by confirming the addition of the selected spreadsheet to the existing Apparity managed Version History.
Add File to History button 